Wednesday, 24 April 2013

How To Disable AutoRun / AutoPlay In Windows 7 & Windows 8


Disable AutoRun / AutoPlay Using Local Group Policy Editor
Step 1: Pull up the Run dialog box (Win + R) and type gpedit.msc. Hit Enter to launch the Local Group Policy Editor.
Step 2: Within Group Policy Editor, navigate to this location:
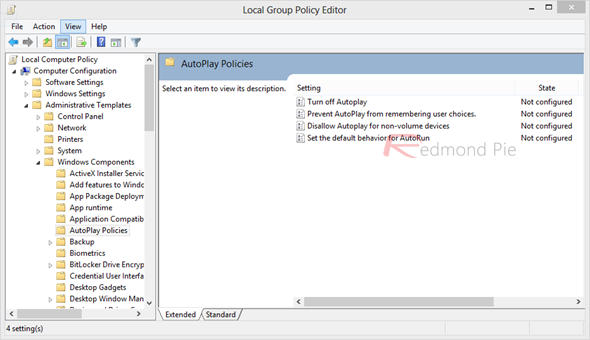
Computer Configuration > Administrative Templates > Windows Components > AutoPlay Policies
AutoRun
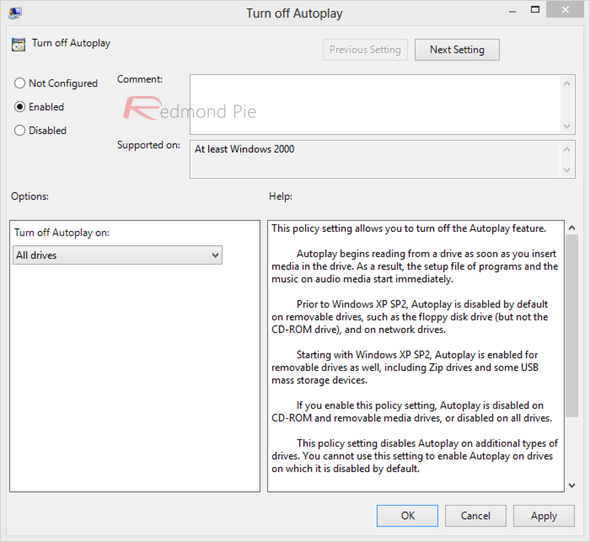
Step 3: Double-click the Turn off Autoplay option to edit its settings, select Enabled, and then select All drives in the options panel below. Hit Apply when done.
Disable-AutoRun
Step 4: Restart your computer.
That’s it; the AutoRun feature has been completely disabled for all users, and for all drives that connect to your machine.
Disable AutoRun / AutoPlay Using Registry Editor
Should you have a version of Windows that doesn’t ship with Local Group Policy Editor, follow these instructions.
Step 1: In the Run dialog, type regedit to launch the Registry Editor.
Step 2: Depending on whether you want to disable AutoRun for all users or just for the current one, navigate to either of these registry keys (the first one is for all users):
HKEY_LOCAL_MACHINE\Software\Microsoft\Windows\CurrentVersion\Policies\Explorer\
HKEY_CURRENT_USER\Software\Microsoft\Windows\CurrentVersion\policies\Explorer\
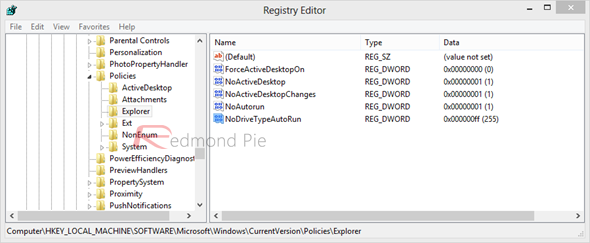
Step 3: Within this subkey, locate the setting labeled “NoDriveTypeAutoRun”. If it doesn’t exist, create a new 32-bit DWORD with this name and assign it the hexadecimal value 000000FF(Decimal 255).
RegEdit-Disable-AutoRun
The DWORD defined above will disable AutoRun for all drives and devices, and will have the same effect that you would’ve gotten through Local Group Policy Editor.
Should you want to restore AutoPlay ever again, just reverse the changes that you made in these steps, and you should be good to go.

How to Upgrade to Windows Server 2008 from Windows Server 2003


If you haven’t upgraded from Server 2003 to Server 2008 — here’s the how-to you’ve been waiting for. Today I’m going to show you how to prepare for a server upgrade and how to perform it. I’ll also tell you why you need to upgrade your server to 2008; let’s start with that.

Why Upgrade to Windows Server 2008

One of the main reasons why you would want to upgrade all of your Servers on your network from Server 2003 to Server 2008 is the 2008 Functional Level. Well, that’s great but what does that really mean? Once you upgrade all your Servers and get the 2008 Functional Level you will get few nifty bonuses:
  1. The first bonus for upgrading to Server 2008 is Distributed File System Replication. What it means in English is that exchange of information between your Domain Controllers is a lot smoother.
  2. Second bonus is Advanced Encryption Standard support for the Kerberos protocol – logins are a lot more secure.
  3. The third bonus is Last Interactive Logon Information. This is a Group Policy Object that will display information about previous logons while you are trying to login yourself. So basically, you are going to be able to see who has logged on to the machine before you.
  4. And finally, the Fine-Grained Password Policies, where you can specify different password and account lockout policies for different sets of users. I believe this little bonus is quite big for most of the administrators.

The Server 2008 Upgrade Process

The upgrade process is not difficult at all and it doesn’t take a very long time. There are a couple of steps that you need to do before running the CD to update your server — here they are:
1. Before you start upgrading, make sure that your server’s hardware is up to specifications for Server 2008 (these are the recommendations, for minimum requirements):
  • At least 512MB of RAM – preferably a lot more
  • At least a 2GHz processor
  • At least 40GB of Available Hard Disk space
  • DVD-ROM Drive
  • At least Super VGA (800×600) monitor
  • Keyboard, mouse, NIC Card, etc.
2. If you are upgrading a 2003 Domain Controller, you will need to copy a couple of scripts from Server 2008 disc to your Server’s hard disk and then run adprep/FORESTPREP and adprep/DOMAINPREP.
3. Now we are ready to upgrade so we can put the CD in the CD/DVD-ROM and install as normal.
A note to those who may have Server 2000 and want to upgrade to Server 2008:
You cannot, I repeat, cannot upgrade from Server 2000 directly to Server 2008. You need to upgrade it first to Server 2003 and then go through these steps and upgrade to Server 2008. Also, make sure your Domain Functional Level is Windows Server 2003. This is really important as you won’t be able to run the upgrade if Domain Functional Level isn’t at Least Server 2003.

Warning: What You Need to Know Before Upgrading to Server 2008

There are a few things you should be aware of before starting the upgrade process:
  1. 2003 Servers should be patched to at least SP1
  2. Small Business Server 2003 and 2003 R2 upgrades are not supported
  3. You can’t upgrade to Server Core
  4. Exchange Server 2007 will not take an in-place upgrade. This is very important, because if you try it will break things. What you need to do is a Mailbox Migration to do this kind of upgrade with Exchange 2007

Preparing Your Server for Upgrade

1. Login to your Domain Controller on the server you are upgrading. First we are going to prepare the Domain Controller Database for upgrade.
2. Go ahead and insert the Server 2008 CD in your CD/DVD-ROM drive.
3. Open My Computer and right-click on CD/DVD-ROM. Then select Explore.
Upgrading to Server 2008 from Server 2003 - 1
4. Double-click on Sources.
Upgrading to Server 2008 from Server 2003 - 2
5. Right-click on the adprep folder and select Copy.
Upgrading to Server 2008 from Server 2003 - 3
6. Now go over to your server’s hard drive and paste the folder on your C:\ drive. In this example, we are going to paste it in the root of C.
Upgrading to Server 2008 from Server 2003 - 4
7. Next, select Command Prompt on your start menu.
If you do not see Command Prompt, select Run, type in cmd and hit the Enter key.
Upgrading to Server 2008 from Server 2003 - 5
8. When in Command Prompt, type in cd\ and hit Enter.
Upgrading to Server 2008 from Server 2003 - 6
9. To verify that the adprep folder is on your hard drive, type in dir and hit Enter.
Upgrading to Server 2008 from Server 2003 - 7
10. Next, type in cd adprep and hit Enter. This will put you in the adprep folder.
Upgrading to Server 2008 from Server 2003 - 8
11. Once you are in that folder we are ready to run the two commands. The first command you should type is adprep /forestprep, then hit Enter.
Upgrading to Server 2008 from Server 2003 - 9
12. Make sure you do not have any Windows Server 2000 machines on your network.
If you do not, type in C and hit Enter.
Upgrading to Server 2008 from Server 2008 - 10
13. Once the process is done you are going to receive a quick confirmation as shown below.
Upgrading to Server 2008 from Server 2003 - 11
14. Next we are going to type in the second command which is adprep /domainprep and hitEnter.
Upgrading to Server 2008 from Server 2003 - 12
15. Domainprep will now run and once it is done you will receive a confirmation.
Upgrading to Server 2008 from Server 2003 - 13
16. You can now close the Command Prompt.
Now we are finally ready for the upgrade.
Quick note for administrators with multiple Domain Controllers that need to upgrade to Server 2008:
The steps above need to be performed only once on your network. Once you run forestprep and domainprep on your network, all your Domain Controllers are now ready for the upgrade. All you need to do is wait for the Active Directory database to replicate to all your DCs and you are ready to go.

Upgrading from Server 2003 to Server 2008

1. Make sure your Server 2008 CD is in the CD/DVD-ROM drive. On your machine, go toWindows Explorer and select CD/DVD-ROM. In this example it is the D:\ drive.
Upgrading to Server 2008 from Server 2003 - 14
2. Double-click on the setup.exe file from inside your Server 2003 machine.
Upgrading to Server 2008 from Server 2003 - 15
3. When the Install Window opens click the Install Now button.
Upgrading to Server 2008 from Server 2003 - 16
4. In this window you will have an option to check for the latest updates from Microsoft. If you choose so, please select the first option.
In this example we are going to skip them for now, so we will select the second option.
Upgrading to Server 2008 from Server 2003 - 17
5. It’s now time to select the Server 2008 version that you want to install.
In this example we are installing the Enterprise (Full Installation) version. Once you make your selection, click Next.
Upgrading to Server 2008 from Server 2003 - 18
6. Go ahead and check the box to accept the license terms agreement and when ready click next.
Upgrading to Server 2008 from Server 2003 - 19
7. The upgrade option should now be available for you. When ready select Upgrade Option to continue.
Upgrading to Server 2008 from Server 2003 - 20
8. You will receive one last warning letting you know to make sure all your applications and 3rd party software can run on windows 2008 as well as of potential issues that you might have.
Make sure to read it and pay close attention to any issues that are listed on the bottom. Once you are ready, click Next.
Upgrading to Server 2008 from Server 2003 - 21
9. Your Server is now being upgraded.
Upgrading to Server 2008 from Server 2003 - 22
One last thing to keep in mind is that the upgrade process may take a lot longer than the installation as it has to upgrade the Active Directory and other services that are already on your Server.
Understanding the Domain Name System (DNS)


DNS stands for the Domain Name System. The DNS records tell the internet where to send your internet traffic. The most common (that I will discuss later) are address (A) records, CNAME records, name server (NS) records and mail exchange (MX) records.

Many web developers simply tell their clients to point the Name Server Record to the new host and you let the web developer manage that for you. The problem you face is that you lose control of your website. If something happens to your developer or you have a falling out, your website and email can stop working... in a heart beat.
So, what does this mean for you? How do you know what you should do to maintain functionality of your site and your email? Bear in mind that my descriptions below are what I tell my my clients, but I think everyone should follow these rules.
Where are the DNS records hosted?
In order for the internet to know where to send traffic, your DNS records must be hosted somewhere. There are three primary ways your DNS records can be hosted.
At your Domain Registrar (My Recommendation)
Where ever you buy the domain is your domain registrar. If you leave the Name Server Records (explained later) at your registrar, you can have complete access to your records when you need to and can fire your web hosting company any time without even having to contact them. I recommend GoDaddy.com. I think their advertising is obnoxious but their service and online interface is great... plus, I can help you if you run into problems. If you aren't with them, I recommend moving your domain registration to them.
At a Third Party DNS Location
This is a good alternative to your Domain Registrar. You have the same level of access (usually). If you have full access to your records, you should be fine managing this way. There are some risks with some DNS hosting services, but it may be a viable option for you. In some cases, this may cost you a small fee.
At Your Web Hosting Company
I never recommend this. I won't allow my clients to host their name server records on my server. I don't want to be responsible if something goes wrong with their email or other services. The only way I can ensure that their email works is if I don't manage those records. If you use a reputable Domain Registrar (like GoDaddy.com) then this should never be a concern. There are some valid reasons why this can be a recommended choice, but more often than not, I do not recommend this.
Problems with DNS records hosting.
Have you ever noticed sometimes that you go to http://example.com you don't get the same result as when you go tohttp://www.example.com? That usually is a problem with the way the DNS records are hosted. Sometimes even the domain registrar will get this wrong. It can almost always be fixed at the DNS host, but I have never had a problem with my DNS hosting at GoDaddy.com... which is one reason why I recommend them.
What are all those records?
There are a lot of different types of records that exist for the internet. There are only a couple that you need to worry about when managing your website. If you can't sleep one night, you can look at Wikipedia for a complete list of DNS record types. However, here is a simplified way to look at the important records that most people should be concerned about.
Address Record (A)
All websites use an IP address to be identified on the internet. An A record tells the internet what name the internet should associate with the name. For example, you can find this site at http://69.64.89.204 but since that is not an easy number to remember, the A record tells the internet that when you type inhttp://www.TributeMedia.com the IP address will be automatically identified. Click on both and you will notice that you end up in the same place.
If you are setting up your domain name to resolve to the right IP address, the A record will point to your main domain is "@". If you are setting up a subdomain for anything, you would simply create an "A" record with the subdomain name. You can have a different site at http://files.example.com. In that case, you would create an A record called "files" pointing to the appropriate IP address and make sure that the subdomain is configured on your web server.
CNAME
A CNAME will point to an A record or another website. The most common use (although there are many) is used to point the subdomain of www to your domain. If you want http://www.example.com to point tohttp://example.com, you would usually create a CNAME called “www” (without the quotes) and point it to your "@" A record.
Name Server Record (NS)
The NS record tells the internet what server is holding all the records. I ask my clients never to change this. If you do change this, all of the other records on your old Name Server become invalidated. If you had any custom records installed, they will become no more. As I mentioned above, I recommend that you leave the Name Server at your domain registrar like GoDaddy.com.
Mail Exchange Records (MX)
You need to have email and the MX records tell the internet where to direct that email. You may have email hosted at your office on an Exchange Server, you may have your email hosted as a Google App or you may have other email arrangements (like with your registrar). The MX records direct traffic to the right email servers. You can change your website hosting without affecting your email if you have control over all the DNS records in one location.
How Do You Apply This Information?
Hopefully this wasn't too overwhelming. When you are making your website live or your are changing some email settings to route traffic, the person helping you will tell you what settings to change. If someone asks you to change your Name Servers, I would seriously question the reason they ask because that may mean that you will lose a bit of control on how you can manage everything. When setting up your DNS records for a site that we host for you, you’ll only need to change two records (if it is different, we’ll tell you. The two records you’ll change is the “@” A record (you’ll put in the IP address we give you). The second is that you’ll make sure there is a CNAME record call “www” (without the quotes) pointed to your “@” A record.
A Note about Shared versus Dedicated Hosting
One of the most common questions I get from clients that are on our shared hosting services is, “When I type in the IP address you gave me, it doesn’t resolve to my site, it resolves to some other site.” When you have a shared hosting account on a server, many people will use the same IP address. What this means is that the server will know how to direct the visitor based on the domain name. If you need to have your IP address point to your site for some reason, that will often cost more money. Usually, that is not required for most corporate or private websites.

10 tips for troubleshooting DNS problems


 Verify network connectivity

When DNS problems occur, one of the first things you should do is verify that the DNS server still has network connectivity. After all, if the problem ends up being something as simple as a NIC failure, you can save yourself a lot of time by checking for the problem up front.
The easiest way to verify connectivity is to log on to the DNS server and try to ping a few machines. You should also try to ping the DNS server from a few random machines. Remember that ping will work only if you allow ICMP packets through the firewall on the machine you are pinging.

 Determine the scope of the problem

After you have determined that basic connectivity still exists, the next step is to determine the scope of the problem. Are Internet name resolutions failing or are local name resolutions failing too? The answer is going to make a difference in how you will have to troubleshoot the problem. For example, if local name resolution works but Internet name resolution does not, the problem may lie with one of your ISP’s DNS servers.

 Find out whether all users are affected

Another thing to look at is whether the problem affects all of the users on the network or it’s limited to a subset of users. If you determine that only some users are affected, check to see whether all those users are located on a common network segment. If so, the problem could be related to a router failure or a DHCP configuration error.

 See whether the DNS server is performing load balancing

Organizations hosting high demand Web servers sometimes try to distribute the workload across multiple identical Web servers by using a load balancing technique called DNS Round Robin. The problem with this technique is that the DNS server has no way of knowing when one of the servers has failed. As a result, inbound traffic is still directed to all the servers in round robin fashion, even if one of those servers is offline. The result is intermittent connectivity problems to the load-balanced resource.

 Check the DNS server’s forwarders

If you determine that local name resolution requests are working but Internet requests are failing, check to see whether your DNS server uses forwarders. Even though many DNS servers use root hints for Internet name resolution, some use forwarders to link to an ISP’s DNS server. And if the ISP’s DNS server goes down, Internet name resolution will cease to function as the entries in the resolver cache expire. If your DNS server does use forwarders, you can try pinging the server to see whether it’s online. You might also have to call the ISP to see whether it’s having any DNS issues and to make sure that the IP address you are using in your forwarder is still valid.

 Try pinging a host

If name resolutions are failing on your local network, try pinging some of the servers on your network. Start out by pinging the server’s IP address. This will confirm that connectivity to the server is working. Next, try pinging by computer name and by the server’s fully qualified domain name.
If you can ping the host by IP address but not by name, check your DNS server to make sure that a Host (A) record exists for the host. Without a Host (A) record, the DNS server will be unable to resolve the host’s name.

Use NSLookup

One of the handiest tools for troubleshooting DNS failures is the NSLOOKUP command, which you can access from a Windows Command Prompt window. Simply type NSLOOKUP followed by the name of the host for which you want to test the name resolution. Windows will return the name and IP address of the DNS server that resolved the name (although the DNS server’s name is often listed as Unknown). It will also provide you with the fully qualified domain name and the IP address of the host you specified.
NSLOOKUP is useful for two things. First, it allows you to verify that name resolution is working. Second, if name resolution isn’t working, it allows you to confirm which DNS server is being used. Keep in mind that NSLOOKUP will list only the DNS server it initially connects to. If the name resolution request is forwarded to other DNS servers, those servers are not listed.

 Try an alternate DNS server

Most organizations have at least two DNS servers. If your primary DNS server is having problems, try using an alternate. If name resolution begins working after you switch DNS servers, you have confirmed that the problem is indeed related to the DNS server and not to some external factor.

 Scan for viruses

About a week ago, someone called me because every time they would try to visit certain Web sites they were redirected to a malicious Web site instead. I initially suspected a DNS poisoning attack, but ruled out such an attack because only one computer was affected.
The problem was that a virus had integrated itself into the TCP/IP stack and was intercepting all name resolution requests. Even though this initially appeared to be a DNS problem, the virus was ultimately to blame.

Reboot the DNS server

I know that it sounds like a cliché, but when all else fails, reboot the DNS server. I have seen several situations over the years in which name resolution stopped for an unknown reason but rebooting the DNS server fixed the problem.
Likewise, I have seen at least two examples of consumer-grade routers that have stopped forwarding DNS requests even though other types of traffic continue to flow. In one of these situations, resetting the router fixed the problem. In the other situation, the router had to be replaced. It was thought that the router might have been damaged by a power surge that had occurred a day before the problems started.

Understanding how DNS works,

DNS (Domain Name Service) is one of the most basic services on the Internet. If you want to effectively set up TCP/IP on your network, you’ll probably need to install a DNS server at some point. But what is DNS and how does it work? In this Daily Drill Down, I’ll take a brief look at DNS and show you some of its ins and outs.

DNS 101
The early Internet landscape was pretty barren with only a few hundred computers making up the ARPANET, the military/educational precursor to the Internet. Then, as today, each device on the network was a node, and each node needed a unique address to enable data packets to find their destinations. Anyone that has ever used IP addresses knows that it’s tough enough to remember a few addresses on your local network, much less keep track of the addresses for remote systems you use often. That’s where host names came into the picture.

Host names provide a more “friendly” way to name hosts, making it easier to remember host addresses. For example, when you want to get the news, you can point your browser to www.newsmax.com instead of 64.29.200.227. Add a couple of hundred other addresses to your frequent site list, and you can see that host names are a lot easier on the brain than IP addresses.

But converting host names to IP addresses doesn’t happen by magic. It needs some form of translation to make it happen, and the mechanism that enables that translation is the Domain Name System, or DNS.

In the early days when there were only a few hundred nodes, a single text file could easily map host names to their corresponding IP addresses. This text file, called Hosts.txt, was managed by the Standford Research Institute (SRI) and contained all of the name-to-address mappings for all nodes on the ARPANET. Operating systems (primarily UNIX at that point) use the Hosts.txt file to map host names to IP addresses. System administrators copied the Hosts.txt file from SRI to their local systems periodically to update their address maps.

As the number of nodes on the network continued to increase, using a relatively static text file to provide mapping quickly became impractical. New hosts were added so rapidly that neither SRI nor system administrators had any hope of keeping up. So, the DNS system was developed in the mid-1980s to provide a dynamic means of updating and resolving host names to their IP addresses.

About those host and domain names
Each device on the Internet is called a host. Whether the host is a computer, printer, router, and so forth, as long as it has a unique IP address, it’s a host. Just as the IP address identifies the host uniquely, so does the host name. For example, assume your computer’s host name is rainbow. Your computer resides in the domain techrepublic.com. So, your computer’s Fully Qualified Domain Name (FQDN) is rainbow.techrepublic.com. The FQDN identifies the host uniquely within the DNS name space.

Domains aren’t limited to a single level. Assume techrepublic.com has two different divisions, one on the east coast and one on the west coast. The east coast domain is east.techrepublic.com and the other is west.techrepublic.com. Sales is located on the west coast, so its domain is sales.west.techrepublic.com. Joe Blow, who works in the sales department, has a computer named jblow. Its FQDN is jblow.sales.west.techrepublic.com. Traffic reaches his computer through something called delegation, which I’ll cover a little later.

The DNS name space contains seven common domain suffixes, which are listed in Table A.

Table A
SuffixPurposeExample
comCommercial organizations (businesses)microsoft.com
eduEducational organizations such as colleges and universitiesberkeley.edu
govGovernmental organizations such as the IRS, SSA, NASA, and so onnasa.gov
milMilitary organizationsarmy.mil
netNetworking organizations such as ISPsmci.net
orgNoncommercial organizations such as the IEEE standards bodyieee.org
intInternational organizations such as NATOnato.int

There are other domain suffixes as well, including national domains such as the us domain, which is used for governmental, regional, and educational entities in the United States. Other countries have their own domains, such as jp for Japan, uk for the United Kingdom, and so forth.

Until recently, an organization known as InterNIC was responsible for managing the majority of the top-level domains in the DNS name space. InterNIC switched from being a nonprofit organization to the now for-profit Network Solutions. When it made that switch, it lost its monopoly on the name space and now there are several entities that register and maintain the DNS name space.

How DNS works
DNS essentially functions as a distributed database using a client/server relationship between clients that need name resolution (mapping host names to IP addresses) and the servers that maintain the DNS data. This distributed database structure enables the DNS name space to be both dynamic and decentralized, giving local domains control over their own portion of the DNS database while still enabling any client to access any part of the database.

At the uppermost level of the DNS name space are the root servers. The root servers manage the top level domains: .com, .net, .org, .mil, .edu, .gov, and .int. With all the domains in existence today, not to mention all the hosts in those domains, you can see why the root servers actually maintain very little information about each domain. In fact, the only data the root servers typically maintain about a domain are the name servers that are authoritative for the domain, or which have authority for the domain’s records.

The authoritative name servers actually maintain the records for a domain, or in some cases delegate some of or the entire domain to other name servers. The root servers know the name servers for techrepublic.com, for example, and within those name servers the west.techrepublic.com domain is delegated to another set of name servers that manage that portion of the overall techrepublic.com domain. In most cases, domains and their records are either managed directly by the organization owning the domain or by the ISP that provides the Internet connection for the organization.

How DNS lookup works
A DNS client uses a resolver to request resolution of a host name to an IP address. The resolver is really just a special-purpose application that's sole function is to act as an intermediary between name servers and various applications that need name resolution, such as Web browsers, e-mail applications, and so on. Here’s an example: Assume you fire up your browser and direct it to connect to www.techrepublic.com. Your local resolver creates a DNS query and sends it to the name server(s) listed in the local computer’s TCP/IP settings.

In this case, I’ll assume that you’re connected to the Internet through a dial-up connection to an ISP, and the ISP’s name servers are specified in your computer’s TCP/IP settings. The resolver sends the DNS request to the first of those name servers. The server checks its cache of previously resolved names, and in this case I’ll assume that the ISP’s name server has no cached results for techrepublic.com. So, that name server sends a DNS query to the root server for the .com domain. The root server responds with the addresses of the name servers that are authoritative for the techrepublic.com domain. Your ISP’s name server then builds another request for www.techrepublic.com and submits it to techrepublic.com’s name server, which responds with the IP address of www.techrepublic.com. That information is passed back to your resolver, which passes it to your application. Suddenly, techrepublic.com’s Web site appears in your browser, and all in a matter of a second or two.

Resolving a host name to an IP address is called forward lookup. There are actually other ways the forward lookup can happen, depending on the way the name servers involved are configured. For now, let’s assume it happens as described above.

Zones, domains, and subnets
You might think there is a relationship between an IP subnet and a domain, but there is actually no correlation at all. A given domain can encompass any number of subnets, none of which have any relationship to the domain itself. In some cases, records in the domain can even point to hosts outside of the domain’s subnets. For example, assume your company maintains its own name servers for its domain but outsources hosting for its Web site. The company name servers contain a record that points the name www to the hosting company’s subnet, outside of those used by your company.

A name server in most cases maintains the records for a portion of the DNS name space called a zone. In many cases, the terms zone and domain seem synonymous, but they’re actually not the same thing. A zone comprises all the data for a given domain except those parts of the domain that are delegated to other name servers. So, a zone is the portion of a domain hosted on a specific name server. When the entire domain resides on a single name server, then domain and zone are synonymous.

As mentioned above, a name server can be authoritative for a zone. This means the server has full information about the zone. A single name server can manage many different zones, a case in point being a hosting company that might host several hundred or even thousands of domains. The hosting company’s name servers would typically manage at least one zone for each hosted domain. In addition, a name server can be authoritative for some zones and non-authoritative for others.

Zones also fall into two categories: primary master or secondary master. A primary master maintains the original records for the zone. The zone’s administrator can create and modify records in the primary zone. A secondary master serves as a read-only copy of the primary (essentially a backup copy of the zone). The name server on which the secondary resides updates its copy of the records through a periodic zone transfer, the frequency of which is controlled by the zone’s configuration. A given name server can maintain primary zones for some domains and secondary zones for others, so the distinction between primary and secondary is zone-related, not server-related.

How about those DNS records?
The main purpose for DNS is to map host names to IP addresses, and the data that makes that possible are stored as records in a zone file on the DNS server hosting the zone. Within each zone file (really just a text file) are resource records that define host names and other domain elements. There are several different types of resource records, each of which performs a specific function.Table B lists resource record types supported by the Windows 2000 DNS service.

Table B
RecordPurpose
SOASpecifies authoritative server for the zone
NSSpecifies address of domain’s name server(s)
AMaps host name to an address
PTRMaps address to a host name for reverse lookup
CNAMECreates alias (synonymous) name for specified host
MXMail exchange server for domain
SRVDefines servers for specific purpose such as HTTP, FTP, and so on
AAAAMaps host name to Ipv6 address
AFSDBLocation of AFS cell database server or DCE cell’s authenticated server
HINFOIdentifies host’s hardware and OS type
ISDNMaps host name to ISDN address (phone number)
MBAssociates host with specified mailbox; experimental
MGAssociates host name with mail group; experimental
MINFOSpecifies mailbox name responsible for mail group; experimental
MRSpecifies mailbox name that is proper rename of other mailbox; experimental
RPIdentifies responsible person for domain or host
RTSpecifies intermediate host that routes packets to destination host
TXTAssociates textual information with item in the zone
WKSDescribes services provided by specific protocol on specific port
X.25Maps host name to X.121 address (X.25 networks); used in conjunction with RT records
WINSAllows lookup of host portion of domain name through WINS server
WINS-RReverses lookup through WINS server
ATMAMaps domain name to ATM address

As you can see in Table B, there are a lot of resource record types to deal with. Fortunately, most installations only require a few of the more common types, including SOA, A, NS, PTR, CNAME, and MX. The SOA record indicates that the server is authoritative for the zone, and Windows 2000 automatically creates an SOA record when you create a zone. The NS records identify the name servers for the zone.

The A record, also called a host record, maps a host name to an IP address. A given host might have different host names all mapped to the same IP address. For example, a multipurpose server might map the www, FTP, and mail host names to the same IP address, since the server performs all of those functions (Web server, FTP server, and mail server). In addition, a zone might have multiple entries for the same host name, each mapped to a different IP address. The server returns all matching addresses to the resolver. When the client is on the same network as the name server, the name server sorts the results so that the address closest to the client is at the top of the list for performance reasons. If the client is on a different network, the server cycles through the addresses in round-robin fashion. In one query, the first matching record is returned at the top of the list. In the second query, the second match is returned at the top of the list and so on. This gives the server the ability to essentially load-balance queries. For example, if you’re hosting the same Web site on redundant servers, round-robin query results enable the DNS server to help balance the load across all of the servers.

CNAME stands for Canonical NAME. CNAME records map an alias name to a Fully Qualified Domain Name (FQDN). They are also called alias records. Host (A) records and CNAME records are usually applied in conjunction with one another. You might map a server’s host name using an A record, then map (for example) www, FTP, and mail using CNAME records.

Mail Exchanger (MX) records are used to route e-mail. An MX record includes the FQDN of the mail server for the zone, along with a preference number from 0 through 65535. The preference number establishes priority for mail, and when there are multiple MX records with different preference numbers, the one with the lowest number is attempted first. Failing that, the sending server uses the record with the next highest number. If all MX records in the zone have the same preference number, the remote mail server decides which record to use to attempt mail delivery.

The Pointer (PTR) record is another common record type. PTR records perform the reverse of what host records do by mapping IP addresses to host names. PTR records enable reverse lookup. When you create or modify an A record, the Windows 2000 DNS service can automatically create or modify the associated PTR record for you.

Regardless of its type, each resource record has certain properties associated with it, and this information is stored along with the record in the zone file. Among these properties is a time-to-live (TTL) property that specifies the number of seconds the resolver should cache the record before it is considered stale and is discarded. When the specified TTL period is reached, the resolver discards the record and a subsequent attempt to resolve the name will pull it from the authoritative name server for the record rather than from the local cache.

The Internet is a dynamic place with hosts coming and going or changing their addresses frequently. The TTL enables records to be cached locally to improve response time and reduce the load on the network, since resolution doesn’t go past the initially queried name server where the record is cached. When the record grows stale, the caching server (or resolver) throws it out, ensuring that the next query will pull an up-to-date version of the record.